
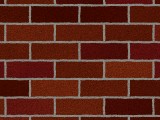
Although POV-Ray provides a brick pattern, it doesn't appear very photorealistic when used "as is". With just a little bit of work, though, and with the aid of some of POV-Ray's other features, it can be used to produce extremely realistic brick walls.
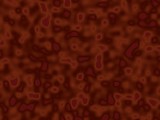
|
| The default brick pattern. |
One of the main problems is that the brick pattern only allows you to use two pigments: the "brick" and the mortar between the bricks. Real brick walls are not monochromatic; there are always variations in colour, even when the builders have done their best to match the bricks.
The trick to simulating this -- without resorting to building walls out of hundreds (or thousands) of randomly-coloured individual brick objects -- is to use the repeat warp modifier, in conjunction with a bozo pattern, as the pigment for the bricks themselves.
Here is a snippet of code used to produce the base colours for a brick wall. I am using a nearby building as my model for the colour scheme. For this building, no attempt was made to use uniform bricks; there are dark and light bricks scattered in a random pattern. I create a basic bozo pattern with three major tones (midtone, darkest, and lightest), returning to the midtone value at the end:
 |
| The underlying bozo pattern. |
    #declare P_RedBrickA = pigment {
      bozo
      pigment_map {
        [0.00 colour rgb <0.60,0.10,0.10>]
        [0.20 colour rgb <0.40,0.05,0.00>]
        [0.80 colour rgb <0.75,0.25,0.10>]
        [1.00 colour rgb <0.60,0.10,0.10>]
      }
    }
Now, obviously, this is too small a pattern (unless we're attempting to produce psychedelic tie-dyed bricks), so we'll add scale 100 before the final closing brace. This produces large areas of apparently solid colours, blending slowly into other colours.
Now we use the repeat warp modifier to produce vertical bands of colour:
 |
| The first repeat warp. |
    #declare P_RedBrickB = pigment {
      P_RedBrickA
      warp { repeat x*8 offset <0,45,0> }
    }
As you can see, there are now distinct columns of different colours, which still blend nicely in the vertical direction. The warp repeats every eight units along the X axis (the default brick width), and each repeat is offset 45 units along the Y axis (an arbitrarily chosen number greater than the default brick height of 3, yet less than the 100 by which the bozo pattern was scaled).
Now we perform a similar repeat warp along the Y axis, but the offset will be along the X axis:
 |
| The second repeat warp. |
    #declare P_RedBrickC = pigment {
      P_RedBrickB
      warp { repeat y*3 offset <60,0,0> }
    }
In this instance, the pattern is repeated every three units along the Y axis (the default brick height), and the offset is a multiple of the brick's width (in this case, the default of 8) plus half the brick's width. I chose to offset it by the width of seven and one-half bricks, for a total offset of 60.
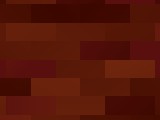
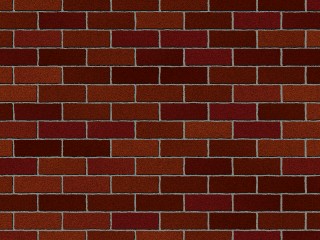
Now that we have produced the pattern we were trying to obtain, we can use it with the brick pattern to produce a much more interesting result:
 |
| Using it in the brick pattern. |
    #declare P_Mortar = pigment {
      colour rgb <0.90,0.89,0.85> }

    #declare P_RedBrick = pigment {
      brick
        pigment { P_Mortar },
        pigment { P_RedBrickC }
      mortar 0.35
    }
Now it's starting to look like a fairly decent brick wall. (Notice that the mortar width/height has been reduced to 0.35, from the default value of 0.5.) There are a number of other tricks we can apply to heighten the realism.
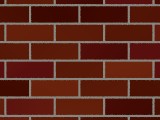
First of all, let's apply some texture to the surface, to make the bricks look rougher. A shallow granite pattern works well (though the effects may not be readily apparent on an 8-bit display):
 |
| A rougher surface. |
    #declare T_RedBrick = texture {
      pigment { P_RedBrick }
      normal { granite 0.1 }
    }
Another way to enhance the look is to apply a very small amount of turbulence to the pigment, since most real bricks do not have razor-sharp edges. (I generally use a turbulence of 0.05, but I will exaggerate it slightly for this example.) Alter the texture statement to read:
 |
| Rougher edges. |
    #declare T_RedBrick = texture {
      pigment { P_RedBrick turbulence 0.075 }
      normal { granite 0.1 }
    }
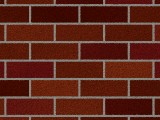
As it stands now, this is a very reasonable brick pattern. However, the mortar is flush with the bricks. If the wall were seen close up, especially at an angle, this would detract from the realism. A simple way to prevent this is to use a clear pigment for the mortar, and use a second surface slightly behind the bricks to represent the mortar:
    #declare P_RedBrick = pigment {
      brick pigment { colour rgbt <1,1,1,1> }, pigment { P_RedBrickC }
      mortar 0.35
    }

    #declare T_RedBrick = texture {
      pigment { P_RedBrick turbulence 0.075 }
      normal { granite 0.1 }
    }

    #declare T_Mortar = texture {
      pigment { colour rgb <0.90,0.89,0.85> }
      normal { granite 0.05 scale 0.3 }
    }

    box { -0.5, 0.5 scale <200,100,1> texture { T_RedBrick }}
    box { -0.5, 0.5 scale <200,100,0.85> texture { T_Mortar }}
 |
| The final product. |
So by using fairly simple techniques, it's possible to build a very complex regular pattern of random pigments. These techniques could easily be modified to produce (for example) adjacent blocks of marble with different striation patterns.
The biggest problem with this pattern, of course, is that it only works in two dimensions so far. This was done for the purpose of clarity; the principle works the same along the z direction as it does along the x axis.
For ease of use, I have created an include file which creates a three-dimensional brick pattern. By declaring constants before including the file, the user may control almost all aspects of the pattern: brick size, mortar width, brick and mortar pigments, normals and finishes, and so on. To download the include file and the accompanying documentation, click on this link; to view the files in your Web browser, click here for the include file, or here for the documentation.